If you have not already done so, inform your Award Leader of your intention to complete your Silver Adventurous Journey. Your Award Leader may also like to be given the link to this website.
If needed, your Award Leader can click here to see our insurance policies and risk assessment documents.
NSW Award Participants
NSW Department of Education (i.e. State/Government) Schools
Education Department Declaration for child-related workers
All other States and Territories (NOT NSW)
If you have not already done so, inform your Award Leader of your intention to complete your Adventurous Journey. Your Award Leader may also like to be given the link to this website.
As part of your Adventurous Journey set-up, you are required to include a Team Goal. Your welcome email includes information on the date and time of a pre-journey meeting, with the purpose being to create this Team Goal.
After this meeting, to set up your Adventurous Journey (Practice and Qualifying) click on the Adventurous Journey section from the list of sections available on your ORB landing page.
- If you are doing a 4-day Combination or the 7-day Snowy River Pack & Paddle Journey, you will need to set up separate Practice and Qualifying Journeys in your ORB. More information on how to do this correctly is listed in the specific Journey Information tabs below.
To create your Practice / Qualifying Journey:
Click on Practice or Qualifying Journey then go to the Overview tab.
Journey Details
- Name
- The name of your journey can be found in the relevant Journey Information tab below.
- Journey Type I
- Practice OR Qualifying
- Journey Type II
- Practical
- Suitable for Level
- Silver
- Mode of Travel
- Hiking
- Location
- The location of your journey can be found in the relevant Journey Information tab below.
Supervisor & Assessor Details:
- Name
- Outward Bound Australia
- Email
- dukeofed@outwardbound.org.au
- Phone
- +61262355700
Press Setup to finish setting up your Journey.
Behaviour
Completing the hike is only half of the requirements. At all times we expect you to:
- Behave respectfully to your peers and Supervisor in both your actions and language.
- Participate in decision making within your map group.
- Give the experience 100% of your commitment and ability.
- Keep a daily log of your trip to assist you with your Adventurous Journey Report.
- Be responsible for you own rubbish.
- Respect the environment.
- Bring only the medication that has been declared in your medical form.
- No other drugs will be permitted, including alcohol, tobacco etc.
Outward Bound Supervisors will send you home if you fail to meet these standards. In this instance we will not approve your journey and we will not issue a refund.
Mobile Phones and Music
There is usually limited mobile phone reception on our walks. You can switch your phone to flight mode if you want to use it to take photos, otherwise turn it off and leave it in your pack. You are not allowed to listen to music, so please don’t expect to walk along with earphones in or play music through speakers at camp.
Toileting
Read your specific itinerary to see what toilets, if any, are available on your journey. If you need to go where there are no toilets you will need to bury your waste. Please bring a sturdy hand trowel for this purpose.
Environmental Care
We follow the seven principles of Leave No Trace. Read up about these principles before leaving home. You might even want to print out the summary as a reminder during your journey.
Ensure the digital Participant Consent and Medical Information Form is filled in and submitted. Your journey dates will be opened in the form 6-weeks before your journey start.
We ask you to complete this no later than fourteen (14) days prior to your journey’s start date.
If you are 17 years or younger, you will need to have your parent or legal guardian complete and submit on your behalf.
If you are diagnosed as having anaphylaxis or chronic asthma you will be required to provide your management or action plan. If your plan is older than 12 months, please visit your GP to have your documents updated.
Getting the right gear for you is crucial for your enjoyment of the journey and ensuring you don’t hurt yourself. Be ruthless in your choices and only pack exactly what you need. All of your items should fit inside your hiking pack to avoid damage to both your gear and the environment, this includes your sleeping mat.
Under 18 years-old? For your safety, your pack should weigh no more than one-quarter (25%) of your body weight.
18 years-old or over? For your safety, your pack should weigh no more than one-third (33%) of your body weight.
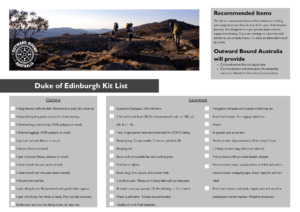
Click on the image below for our recommended kit list. To help you source everything, we have teamed up with Camp List, who offer many of the items specified for hire and/or purchase. To see what they have available go to www.camplist.com.au and in the central search bar type “Outward Bound Australia”.
What meals to pack
For your Silver Adventurous Journey, we expect you to provide the following meals as a minimum:
- Lunches for every day.
- Dinners for every night.
- Breakfasts for every morning.
- High energy snacks for every day.
Enjoy your food, enjoy your journey
The key to a great hike is great fuel. Here are some tips to consider and some food suggestions.
- A balanced hiking diet includes more fat and sugar than a normal diet.
- Remove as much packaging as you can and re-pack in zip-lock bags.
- Package your zip-lock bags by meal rather than individual items and label them
- e.g. Lunch Day 1
- Canned food is too heavy and glass bottles and jars may break in your pack, so dispense these foods where possible.
- Pack breakfast and dinner in one big strong stuff-bag, and lunch and snacks in another of a different colour. This makes it easier to find what you want when you need it.
- Consider if you really need a bowl, or can you eat from your pot? Do you really need a dinner knife, fork and spoon?
- There are often no garbage bins at campsites or on trail so you’ll have to carry out all the packaging you carry in.
- Bring the lightest food that takes the shortest time to cook.
Be aware that everything has to survive without refrigeration (please don’t bring a cooler bag). Check out the Food Safety Information Council for advice on appropriate foods for camping and bushwalking.
Food Suggestions
Breakfast
Cereals, muesli or instant oats with long life or powdered milk.
- Long life milk can be found as single-serve poppers
- Powdered milk is much lighter and only needs water added to it.
Hot breakfast such as baked beans or spaghetti provide great protein but are heavy to carry. You may also need to wake up earlier to cook, eat, and clean up in enough time.
TIP: Measure out the amount of cereal per day and put in a snap lock bag with powdered milk.
Lunch
Crackers like Ryvita, Salada, and Vita-weets provide good levels of carbohydrate.
Bread and wraps are ok for Day 1, but can quickly go stale.
Cheese such as Laughing Cow, Dutch Edam or Babybells keep well.
Dried meats including salami and jerky etc. are great forms of protein and salt. It will keep fresher if whole, so remember a knife. Fresh meats are not recommended.
Salad vegetables including carrots, cucumber, capsicum etc. keep well in packs. Also consider deli items like sun-dried tomatoes.
Spreads like Vegemite, hummus, chunky dips and honey make great additions to crackers.
TIP: It’s better if you don’t have to cook lunch as we may not have time.
Dinner
Packaged pasta and rice are good options, although may take longer to cook. Couscous is a good choice if you want a speedy meal.
Add a packet tuna, salmon, or ham to get protein and add freeze dried vegetables for nutrition. These are cheap and easy meals. Just remember to look after the rubbish.
Freeze dried/dehydrated meals from brands like Back Country, Campers Pantry and The Outdoor Gourmet Company are a great balance between weight and nutrition but are more expensive to buy.
Snacks
Hard fruits like apples are great. Soft fruits if not protected can go soggy. Dried fruits are your best option.
Make your own trail mix with a selection of sultanas, seeds, dried fruit and chocolate! However, please do not add nuts to your mix. We are a nut-aware organisation.
Packaged bars and snacks like muesli bars, LeSnacks and grain biscuits are good snacks and are generally light. Strip off the bulk packaging at home and keep these foods together in zip-lock bags.
Packaged soups, particularly if your journey dates will be cold, can be a great treat. 2-minute noodles and all other similar foods are okay for a hot snack, but are not satisfactory for an evening meal due to their limited nutrition.
TIP: Think of your snacks as supplementary to your main meals. Sugary things are okay for a special treat, but not as a source of long-term energy.
Drinks
When you are walking, water should be your only drink. If the weather is hot, you may consider bringing Hydralyte to help restore electrolytes. Please don’t bring drinks such as Gatorade etc. as they are not designed for the endurance exercise of hiking.
Hot drinks like Cup-a-Soups, hot chocolate, milo, tea or coffee are a lovely treat at camp. Just remember to measure out the quantities needed rather than carry the container.
Physical Training
We advise you do several training walks in the footwear you will be wearing and carrying your loaded backpack. Walk around the block to start with and build up to hour-long walks over uneven ground. Gradually increase the weight of your pack each time. This will greatly increase your ability to walk and carry the heavy pack, thereby enhancing your enjoyment of the journey. Training in the bush is ideal.
Navigation
Your Supervisor will coach you how to use topographic maps with an expedition compass. However, why not start learning now? If you are at school, ask a Geography teacher for a tutorial. There are loads of great videos available online as well.
Equipment
Make sure you know how to use all your gear before you head out. You want to feel confident that you know what you are doing. Find a suitable patch of grass and practice setting up and packing down your tent, until you can do it by yourself easily. Cook up your intended meal/s in the stove you will be bringing so you know how much you can fit in both the pot and your stomach. You don’t want to get to camp and cook up a feast, only to find out you have too much or too little of both quantity and flavour.
If you are undertaking your Qualifying Adventurous Journey, you will be required to submit an Adventurous Journey Report before you can be signed off.
Click here to download the suggested template.
Bring a small notebook and write the key headings of your report on the first few pages to jog your memory on what to look out for along your journey.
Your AJ Report always looks better when you add pictures, so remember to bring a camera to document your experience.
Go to the next section below for instructions on how to obtain your journey documents. There may be differences in available documents across the journeys.
Itinerary
This is the basic overview of your journey. Your parents will want a copy of this so they know where and when to drop your off, and pick you up.
Route Plan
This is the detailed hiking notes for your journey. You must bring a copy of the Route Plan with you. We recommend printing these on A4 paper. You will be writing on this document during your journey, so you will need to be able to protect the pages from damage. Either a zip-lock bag (to use a regular pen on paper) or laminating the sheets and writing with a very fine tipped permanent marker are common options.
You may see that some information has not been included. If this is the case for your journey, you will need to fill add the relevant information during your journey.
Maps
You must bring a copy of your map with you.
Some journeys have maps available on this webpage for download. Other journeys, particularly those on the VIC Great Ocean Walk require you to buy your map ahead of time.
If you are downloading digital maps, these must be printed in a very particular way to ensure they are correctly scaled and legible. Each map document in the next section below has specific instructions to ensure the correct quality. We recommend having your maps professionally printed from an Officeworks or similar company.
Your map is one of your most important documents during your expedition, and you should protect your map from damage. Suitable options are to purchase a map-case or laminate all your map pages individually and bring a very fine tipped permanent marker to draw up your check-points over the laminate.
Phones on your Journey
We encourage Participants to come with their phone, where they have one. Phones provide access to some useful functions, with the most common being:
- Taking photos of your journey, which will be important for your Qualifying AJ Report (see Point 8 above).
- If you do take photos that include other people, please ensure you get their permission first.
- Using GPS and a Map app to assist with confirming your location, as part of learning how to use the topographic maps you need to print and bring with you (see Point 9 above).
- Where service is available, getting updated weather and hazard information.
We do not permit using phones for entertainment or social purposes during your journey. You need to be focused on your navigation and the other people in your group.
There is no opportunity to recharge your phone, or another electronic device, while on your journey. We recommend setting your phone to flight-mode and bringing a Powerbank that can provide one full charge per day of your journey.
Contact During your Journey
All the locations we use for Adventurous Journeys have partial mobile coverage that is dependent on your service provider’s signal strength in the area. Participants and their families will not always be able to contact each other during the Journey. Sometimes text messages can get through where a phone call cannot.
The Journey Supervisor (in the field with the group) and the Program Coordinator (in the office) communicate with each other, with group progress and environmental updates, minimum twice daily using a satellite communication and tracking device (Garmin InReach).
Outward Bound Australia deliver Adventurous Journeys on a basis of no news is good news. If you do not hear anything from an Outward Bound staff member, then everything is progressing as anticipated.
Supporters, if an Award Participant contacts you during the journey with a journey-related concern, please encourage them to speak with their Journey Supervisor. Common examples are an upset stomach, headache, and developing blisters or sore spots. We have first aid training and associated kit available to help; we just need to know help is required. We want to assist all Participants to safely and successfully complete their Journey.
Supporters, if you are struggling to get an important message to your Award Participant, or need to contact Outward Bound Australia staff:
- For general correspondence of a non-urgent nature, please e-mail Outward Bound Australia at mailbox@outwardbound.org.au. Please reference the Participant’s name and their Journey in the subject heading.
- For urgent and emergency situations arising at home, please use the following numbers:
- During business hours (9:00am – 4:50pm) please call your Client Manager on 02 6235 5700 (option 1).
- After hours (5:00pm – 8:30am) the Program Coordinator can be reached on 0409 746 947.
Online Record Book Journey Details Set-Up
Practice Journey
- Name
- Tidbinbilla Nature Reserve to Booroomba Station
- Dates
- Day 1
- Location
- Tidbinbilla Nature Reserve
Qualifying Journey
- Name
- Booroomba Station to Namadgi Visitor Centre
- Dates
- Day 2 – Day 4
- Location
- Namadgi National Park
Meeting Points
Start: Dalsetta Car Park, Tidbinbilla Reserve Road
9:00am
See the location on Google Maps.
Please not this is not Tidbinbilla Visitor Centre, which is currently closed until further notice.
End: Namadgi Visitor Centre, Naas Road, Tharwa
approx. 3:00pm
Route Plan
You will be provided with your full route by Outward Bound Australia upon arrival.
Map
You will be provided with maps by Outward Bound Australia upon arrival.
Online Record Book Journey Details Set-Up
Practice or Qualifying Journey
- Name
- Roseville to Ku-ring-gai
- Dates
- Day 1-3
- Location
- Lane Cove and Berowra Valley National Parks
- Other Location Information
- Part of Great North Walk
Meeting Points
Start: Roseville Train Station 9:00am
End: Mount Ku-ring-gai Train Station approx. 1:00pm
Route Plan
GNW-S4 Roseville to Cowan Route Plan
Roseville to Ku-ring-gai Supplementary Day 3 Route Plan
You are expected to bring the Route Plan document with you. This document should be protected from damage. It is okay to print this as double-sided, or two pages per sheet.
IMPORTANT NOTE:
In the Roseville to Cowan route plan (first document) you only need to print pages 1-4. You will cease using these track notes once you reach Crosslands Reserve (Night 2 of your journey). For your final day, refer entirely to the Roseville to Ku-ring-gai Supplementary route plan (second document).
Map
GNW-S4 Roseville to Cowan Topo Map
You only need to print pages 1-3 (not page 4).
This map needs to be printed in colour, A3 size and with no (default) scaling.
Remember you must bring a hard copy of your map on your journey. You will also require a very fine tipped permanent marker pen to plot your route.
Online Record Book Journey Details Set-Up
Practice Journey
- Name
- Roseville to Baden Powell Activity Centre
- Dates
- Day 1
- Location
- Lane Cove National Park
- Other Location Information
- Part of Great North Walk
Qualifying Journey
- Name
- Baden Powell Activity Centre to Cowan
- Dates
- Day 2 – Day 4
- Location
- Berowra Valley National Park
- Other Location Information
- Part of the Great North Walk
Meeting Points
Start: Roseville Train Station 9:00am
End: Cowan Train Station approx. 12:00pm
Route Plan
GNW-S4 Roseville to Cowan Route Plan
You are expected to bring the Route Plan document with you. This document should be protected from damage.
You may also wish to refer to the more information below. This is the original source material, taken from Wild Walks, which provides detailed information for many hiking routes across Australia. You can either download and print the PDF version available on the Wild Walks site or cut out the relevant sections and create your own through-journey track notes.
- Roseville to Chatswood Station via Lane Cove River walking track (wildwalks.com)
- Roseville Station is your start point, and is also the start of the journey shown in the link.
- Meeting time is 9am.
- You are following this journey from Roseville Station until you reach Riverside Café (refer to the green box that starts with the heading 2.52km Int. Lady Game Dr and Delhi Rd → Riverside Café)
- Sydney to Thornleigh via Lane Cove Tourist Park walking track (wildwalks.com)
- Start your notes from 18.78km Riverside Café → Koonjeree Middle Trk. (About half-way down the webpage). Also use the next notes of 19.01km Koonjeree Middle Trk → Lane Cove Weir South
- Skip past the next route notes UNTIL 23.58km Lane Cove Weir South → Lane Cove Weir North as this is where you will continue from.
- Follow the rest of this journey as per the route notes to Thornleigh Station (end of webpage).
- Thornleigh to Cowan walking track (wildwalks.com)
- Use all the notes as written. Your Day 2 campsite is Crosslands Campsite (referenced in a blue box).
Map
GNW-S4 Roseville to Cowan Topo Map
Remember you must bring a hard copy of your map on your journey. You will also require a very fine tipped permanent marker pen to plot your route.
This map needs to be printed in colour, A3 size and with no (default) scaling.
There are 4 pages in total. We recommend printing single-sided for easiest use. If you do wish to reduce the number of individual pages used, then ensure to print:
- Page 1 with Page 3
- Page 2 with Page 4
Meeting Points
Start: Colac Train Station 9:30am
End: Colac Train Station approx. 4:00pm
Basic Trip Notes
Please refer to the official Great Ocean Walk website for your basic itinerary information.
The specific notes for each day can be found here:
- Appolo Bay to Shelley Beach (Elliot Ridge Campsite)
- Shelley Beach to Parker Inlet
- Parker Inlet to Aire River
- Aire River to Johanna Beach
Map
You need to purchase the official Great Ocean Walk Map.
The link above takes you to one place where you can purchase this map, Meridian Maps. You are not obliged to use this provider. We strongly encourage you to weather-proof your map. Meridian Maps has a laminated option for purchase.
We expect everyone to bring a hard copy of the map on your journey. You will also require a pencil (for paper map) or very fine tipped permanent marker pen (for laminated map) to mark your route.